How to Patch Test: A Physician’s Guide to Clinical Protocols and Diagnostic Accuracy
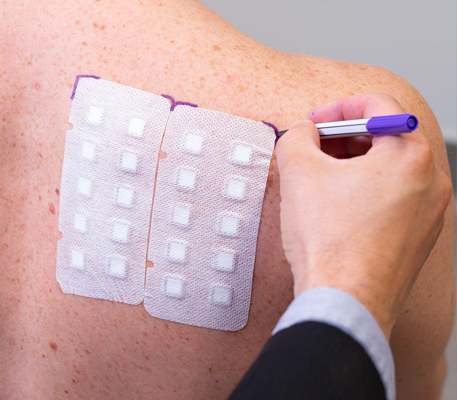
Patch testing is the gold standard for diagnosing allergic contact dermatitis, yet many clinicians hesitate to incorporate it into their practice. The reason isn’t lack of interest. It’s the perception that patch testing is complicated.
- Scheduling multiple visits.
- Managing allergen trays.
- Interpreting results.
For busy dermatology and allergy practices, these logistics can feel like barriers. But the reality is this: patch testing is a powerful diagnostic tool, and can be a meaningful differentiator for your practice.
Allergic contact dermatitis affects approximately 20% of the global population, yet many patients spend years searching for answers. Patch testing is the only method capable of identifying the allergens responsible for their reactions and giving them a clear path toward relief.
When providers offer patch testing, they do more than diagnose dermatitis. They provide clarity to patients who have often struggled with chronic, unexplained skin disease.
This article focuses on one specific goal: how to patch test.
If you’re looking for guidance on who to patch test, how to counsel patients afterward, or how to interpret results, C.D.I. Community offers in-depth videos on those topics, but we've laid out a comprehensive guide below.
Step 1: Patient History and Consultation
Before applying allergens, start with a thorough patient history. Patch testing is most effective when clinical suspicion is paired with careful exposure assessment.
During the consultation, evaluate:
- Existing skin conditions
- Symptom onset and duration
- Frequency and severity of flares
- Pattern and distribution of dermatitis
Equally important is understanding where exposures occur. Ask about:
- Workplace exposures
- Home and cleaning products
- Personal care products
- Hobbies and recreational activities
Occupational patterns can be particularly revealing. Hairdressers, healthcare workers, construction workers, and food handlers often encounter specific allergens related to their professions.
The information gathered here will guide allergen selection and interpretation later in the process.
For deeper discussion on patient selection and clinical clues, explore the C.D.I. Community training videos.
Step 2: Clinical Setup
Once the patient evaluation is complete, preparation for testing begins. A well-organized clinical setup helps ensure consistency, efficiency, and accurate results.
Supplies Needed
Common patch testing materials include:
- Patch test panels/chambers like Finn Chamber or allergEAZE Chambers
- Ready to use panels like T.R.U.E. TEST®
- Allergen syringes
- Allergen trays and dispensing tools for accurate allergen loading
- Skin markers for numbering panels
- Reinforcement tape or adhesive support (such as PatchProtect)
Having a standardized setup helps streamline workflow and reduces errors during allergen loading.
Step 3: Allergen Selection
Most clinicians begin with a baseline screening series of common allergens like the Contact Dermatitis Institute Series or the American Core Series recommended by ACDS.
However, patient history often indicates the need for extended allergen series. These additional panels target specific exposure patterns.
Examples include:
- Hairdresser series
- Baker or food handler series
- Cosmetic series
- Dental material series for technicians
- Or other occupational allergens
The goal is always the same: match allergens to real-world exposures. This is where patient history becomes invaluable.
Step 4: Optimizing the Patch Test Schedule
Patch testing typically occurs over three visits within one week, allowing time for delayed hypersensitivity reactions to develop. Several scheduling models work well in clinical practice.
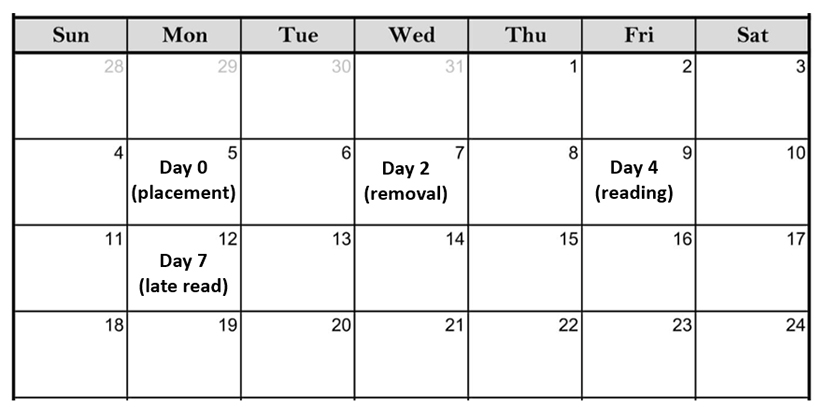
Standard Schedule Option 1
- Monday: Apply patches
- Wednesday: Remove patches and perform first reading
- Friday: Final reading
- Optional Monday: Optional late reading
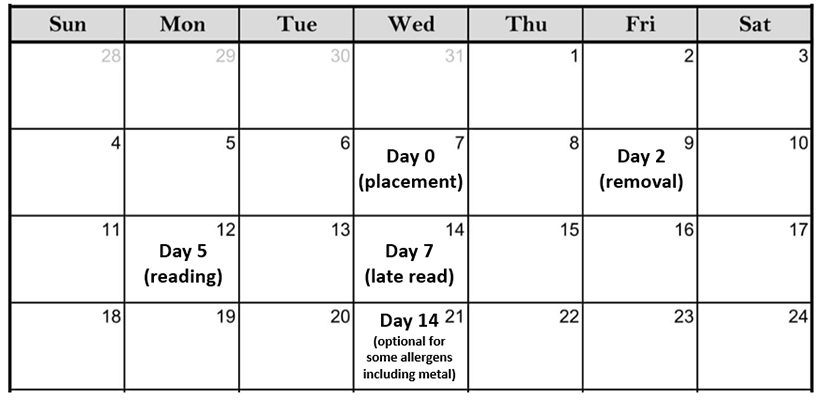
Standard Schedule Option 2
- Wednesday: Apply patches
- Friday: Remove patches and perform first reading
- Monday: Final reading
- Optional Wednesday: Optional late reading
Modified Schedule for Insurance Limitations
Some insurers limit allergen placement to 80 allergens per day. In these situations:
- Wednesday: Apply first set of allergens
- Thursday: Apply additional allergens
- Saturday: Patient removes patches at home
- Monday: First reading
- Optional Wednesday: Optional late reading
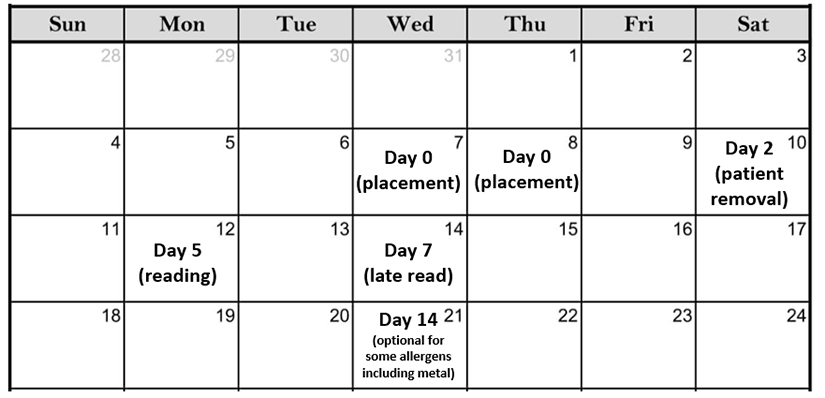
The key principle is allowing 48 hours of occlusion and delayed evaluation for immune responses to develop.
Step 5: Numbering, Filling, and Applying Chambers
Consistency during chamber preparation is essential for diagnostic accuracy.
Numbering the Chambers
Patch test chambers are numbered in a mirror image orientation. Many clinicians recommend numbering chambers consistently until the layout becomes second nature.
Accurate numbering ensures that positive reactions can be traced back to the correct allergen.
Loading the Chambers
Proper chamber loading is essential for reliable patch test results. Consistency in preparation helps reduce the risk of false negatives, cross contamination, and allergen misidentification.
Number the Chambers
Begin by numbering the chambers in a mirror-image orientation, matching the sequence on your Patch Test Data Form.
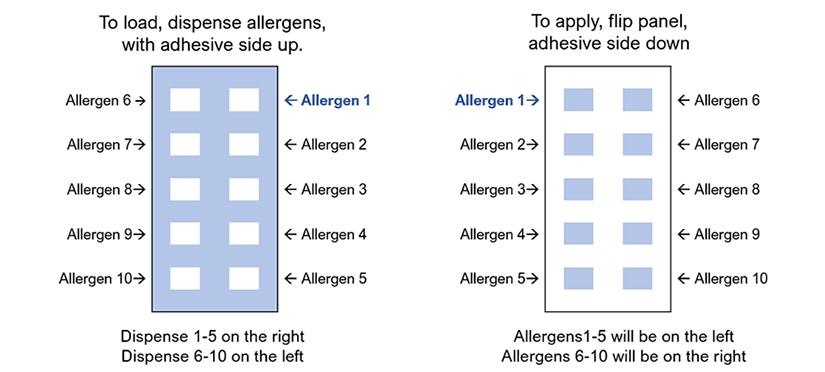
Accurate numbering ensures that any positive reactions can be traced back to the correct allergen. Many clinicians recommend numbering chambers the same way each time until the layout becomes second nature.
Fill the Chambers
When loading allergens using a syringe-based method:
- Turn the panel over so the adhesive side is facing upward.
- Begin dispensing allergen in the first chamber located in the upper right corner of the panel (chamber #1).
- Continue filling chambers according to the numbered sequence.
Correct allergen volume is critical.
Too little allergen may lead to false negative results, while too much can increase the risk of cross contamination between chambers.
For most 8 mm chambers, the recommended dose is approximately 15–20 microliters of allergen:
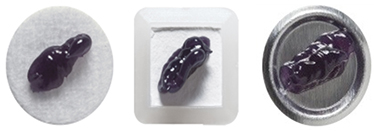
To help standardize dosing, many clinicians use tools such as the TruVol Precision Allergen Dispenser, which delivers a consistent 20 µL dose with each use.
Because chamber sizes vary by manufacturer, always review the instructions for the specific chamber system you are using.
Preparing Panels in Advance
Panels can be prepared in advance if needed, but proper storage and labeling are essential.
If preparing chambers several hours before placement, cover the allergens and store the panel in the refrigerator.
If preparing allergens up to one week in advance, specialized storage solutions such as patchTransport or patchPrep may be used, along with refrigeration.
In both cases:
- Clearly label each panel with the patient’s name
- Include the panel number to avoid confusion during application
Liquid or volatile allergens should never be pre-filled, as evaporation or degradation may affect test accuracy.
Additional Tips for Accurate Loading
A few simple techniques can make chamber loading easier and more consistent:
- Add liquid or volatile allergens immediately before panel placement
- Use filter papers when dispensing liquid allergens
- Allow petrolatum allergens to reach room temperature before dispensing, which makes syringe delivery smoother
Taking a few extra moments during panel preparation helps ensure accurate allergen dosing and reliable diagnostic results.
Step 6: Patch Application
The most common location for patch testing is the upper back, as it is ideal for patch testing due to its large, flat surface and minimal exposure to sun, scratching, or skin disease. However, other sites may be used if necessary. Alternative locations include:
- Upper arms
- Abdomen
- Thighs
Several patient factors should be considered before application:
- Skin Condition: Active dermatitis on the testing site can interfere with interpretation.
- Medications: Systemic immunosuppressants may suppress reactions and lead to false negatives.
- Tanning or Phototherapy: Recent UV exposure can alter immune responses in the skin.
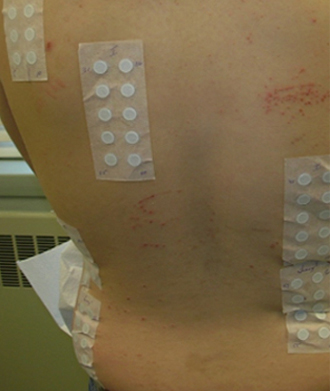
- Tattoos: Tattooed areas should generally be avoided when placing patches.
Here are some examples of avoidance:
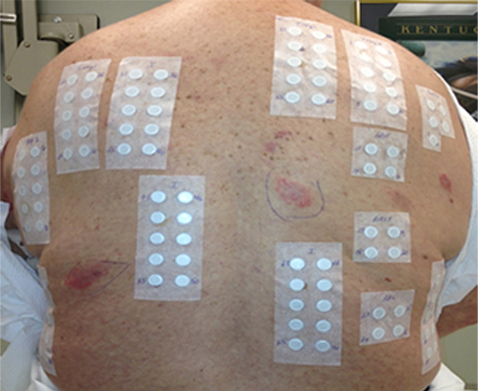
Skin Preparation and Hair Guidelines
Proper skin preparation helps ensure good adhesion and reliable results. If excessive hair is present:
- Hair may be clipped or shaved with an electric razor
- Avoid shaving with a blade, which may irritate the skin
Hair removal should never cause skin irritation before patch placement.
Patient Posture During Application
Patient positioning also matters. A relaxed, neutral posture is recommended during patch placement. This reduces skin tension and helps ensure chambers adhere evenly across the back.
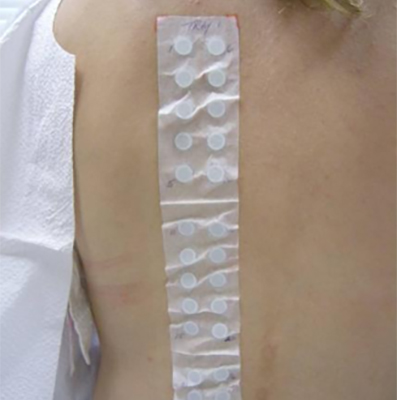
If a patient's back is too rounded during application, patches may wrinkle causing poor adhesion.
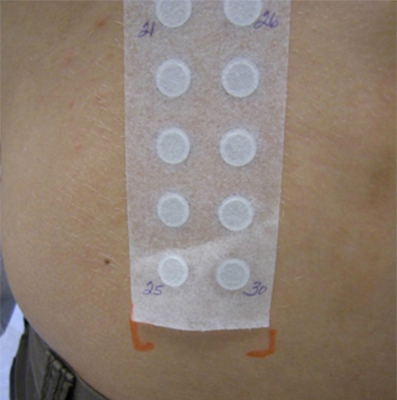
If a patient is too “military straight” during application, patches may come loose when the patient relaxes their back.
Reinforcing the Panels
After placement:
- Press panels firmly into place
- Reinforce with additional tape if needed
- Products such as patchProtect can help maintain adhesion
Secure panels minimize the risk of displacement during the 48-hour wear period.
Step 7: Reading the Patch Test
Patch test readings occur over multiple visits because allergic reactions are delayed immune responses.
A typical workflow includes:
- First reading: at 48 hours (when patches are removed)
- Second reading: at 72–96 hours
- Optional late reading: at 5–7 days for certain allergens
Interpreting patch test reactions requires experience and careful clinical correlation.
For a detailed walkthrough of grading reactions and determining relevance, watch Patch Test Reaction Reading and Scoring on C.D.I. Community which also includes a test at the end to help confirm your knowledge.
Step 8: Documentation and Coding
Accurate documentation is essential for both clinical care and reimbursement. Documentation should include:
- All allergens tested
- Patch placement location
- Reaction grading at each reading
- Clinical relevance assessment
Clinicians should also ensure that CPT codes and documentation support medical necessity. Detailed coding guidance is available on C.D.I. Community.
Training and Education Opportunities
Patch testing is a skill that improves with repetition and training. Contact Dermatitis Institute offers multiple ways for clinicians to deepen their expertise:
Annual 2-Day Hands-On Training: In-person workshops focused on practical application and interpretation.
Online Training: Structured education that allows providers to learn at their own pace.
C.D.I. Community: An expanding library of on-demand videos covering:
- Patient selection
- Patch test interpretation
- Allergen relevance
- Clinical workflow optimization
Conclusion: Building Diagnostic Excellence in Contact Dermatitis
Diagnosing allergic contact dermatitis is rarely a single moment of discovery. It is a process built on pattern recognition, careful testing, and clinical experience.
Patch testing allows clinicians to move beyond treating symptoms and instead identify the underlying cause of disease.
For patients with chronic dermatitis, that diagnosis can be life-changing.
At Contact Dermatitis Institute, our goal is to shorten the learning curve for clinicians who want to offer patch testing in their practice.
If you’re ready to expand your diagnostic capabilities:
- Join the C.D.I. Community
- Attend an online or in-person training program
- And most importantly—keep patch testing.
Because every patient deserves a diagnosis.